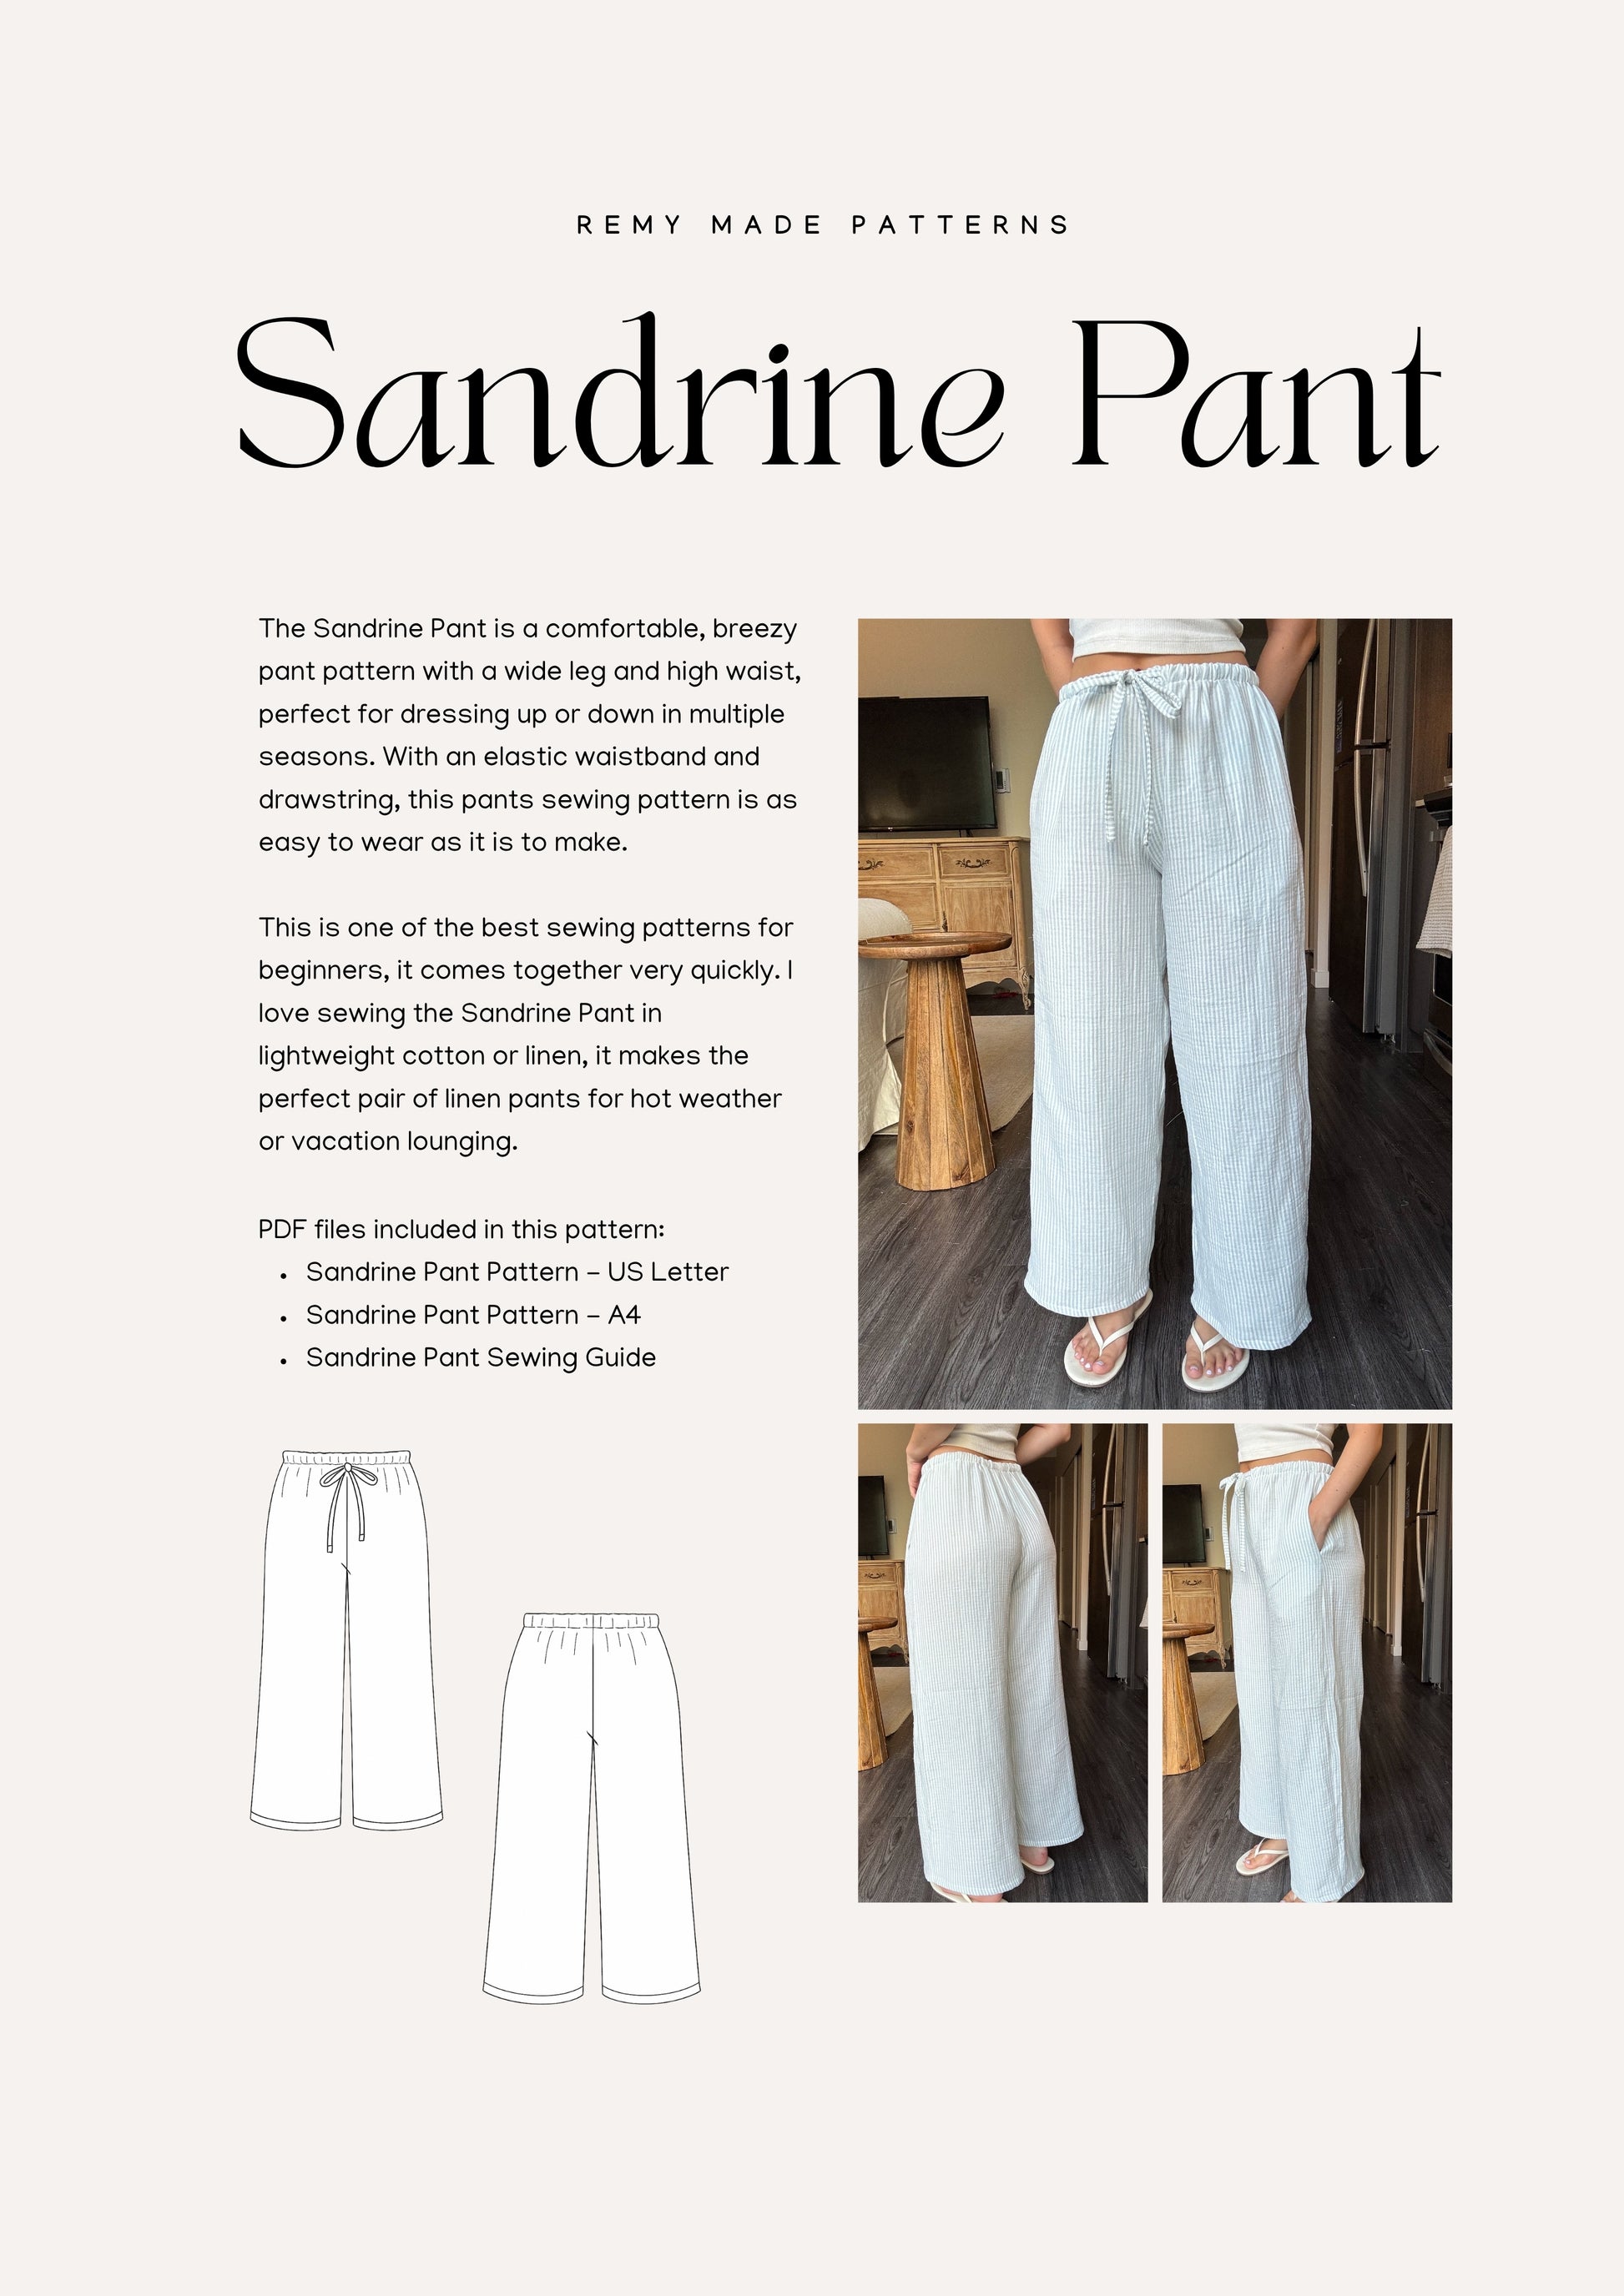
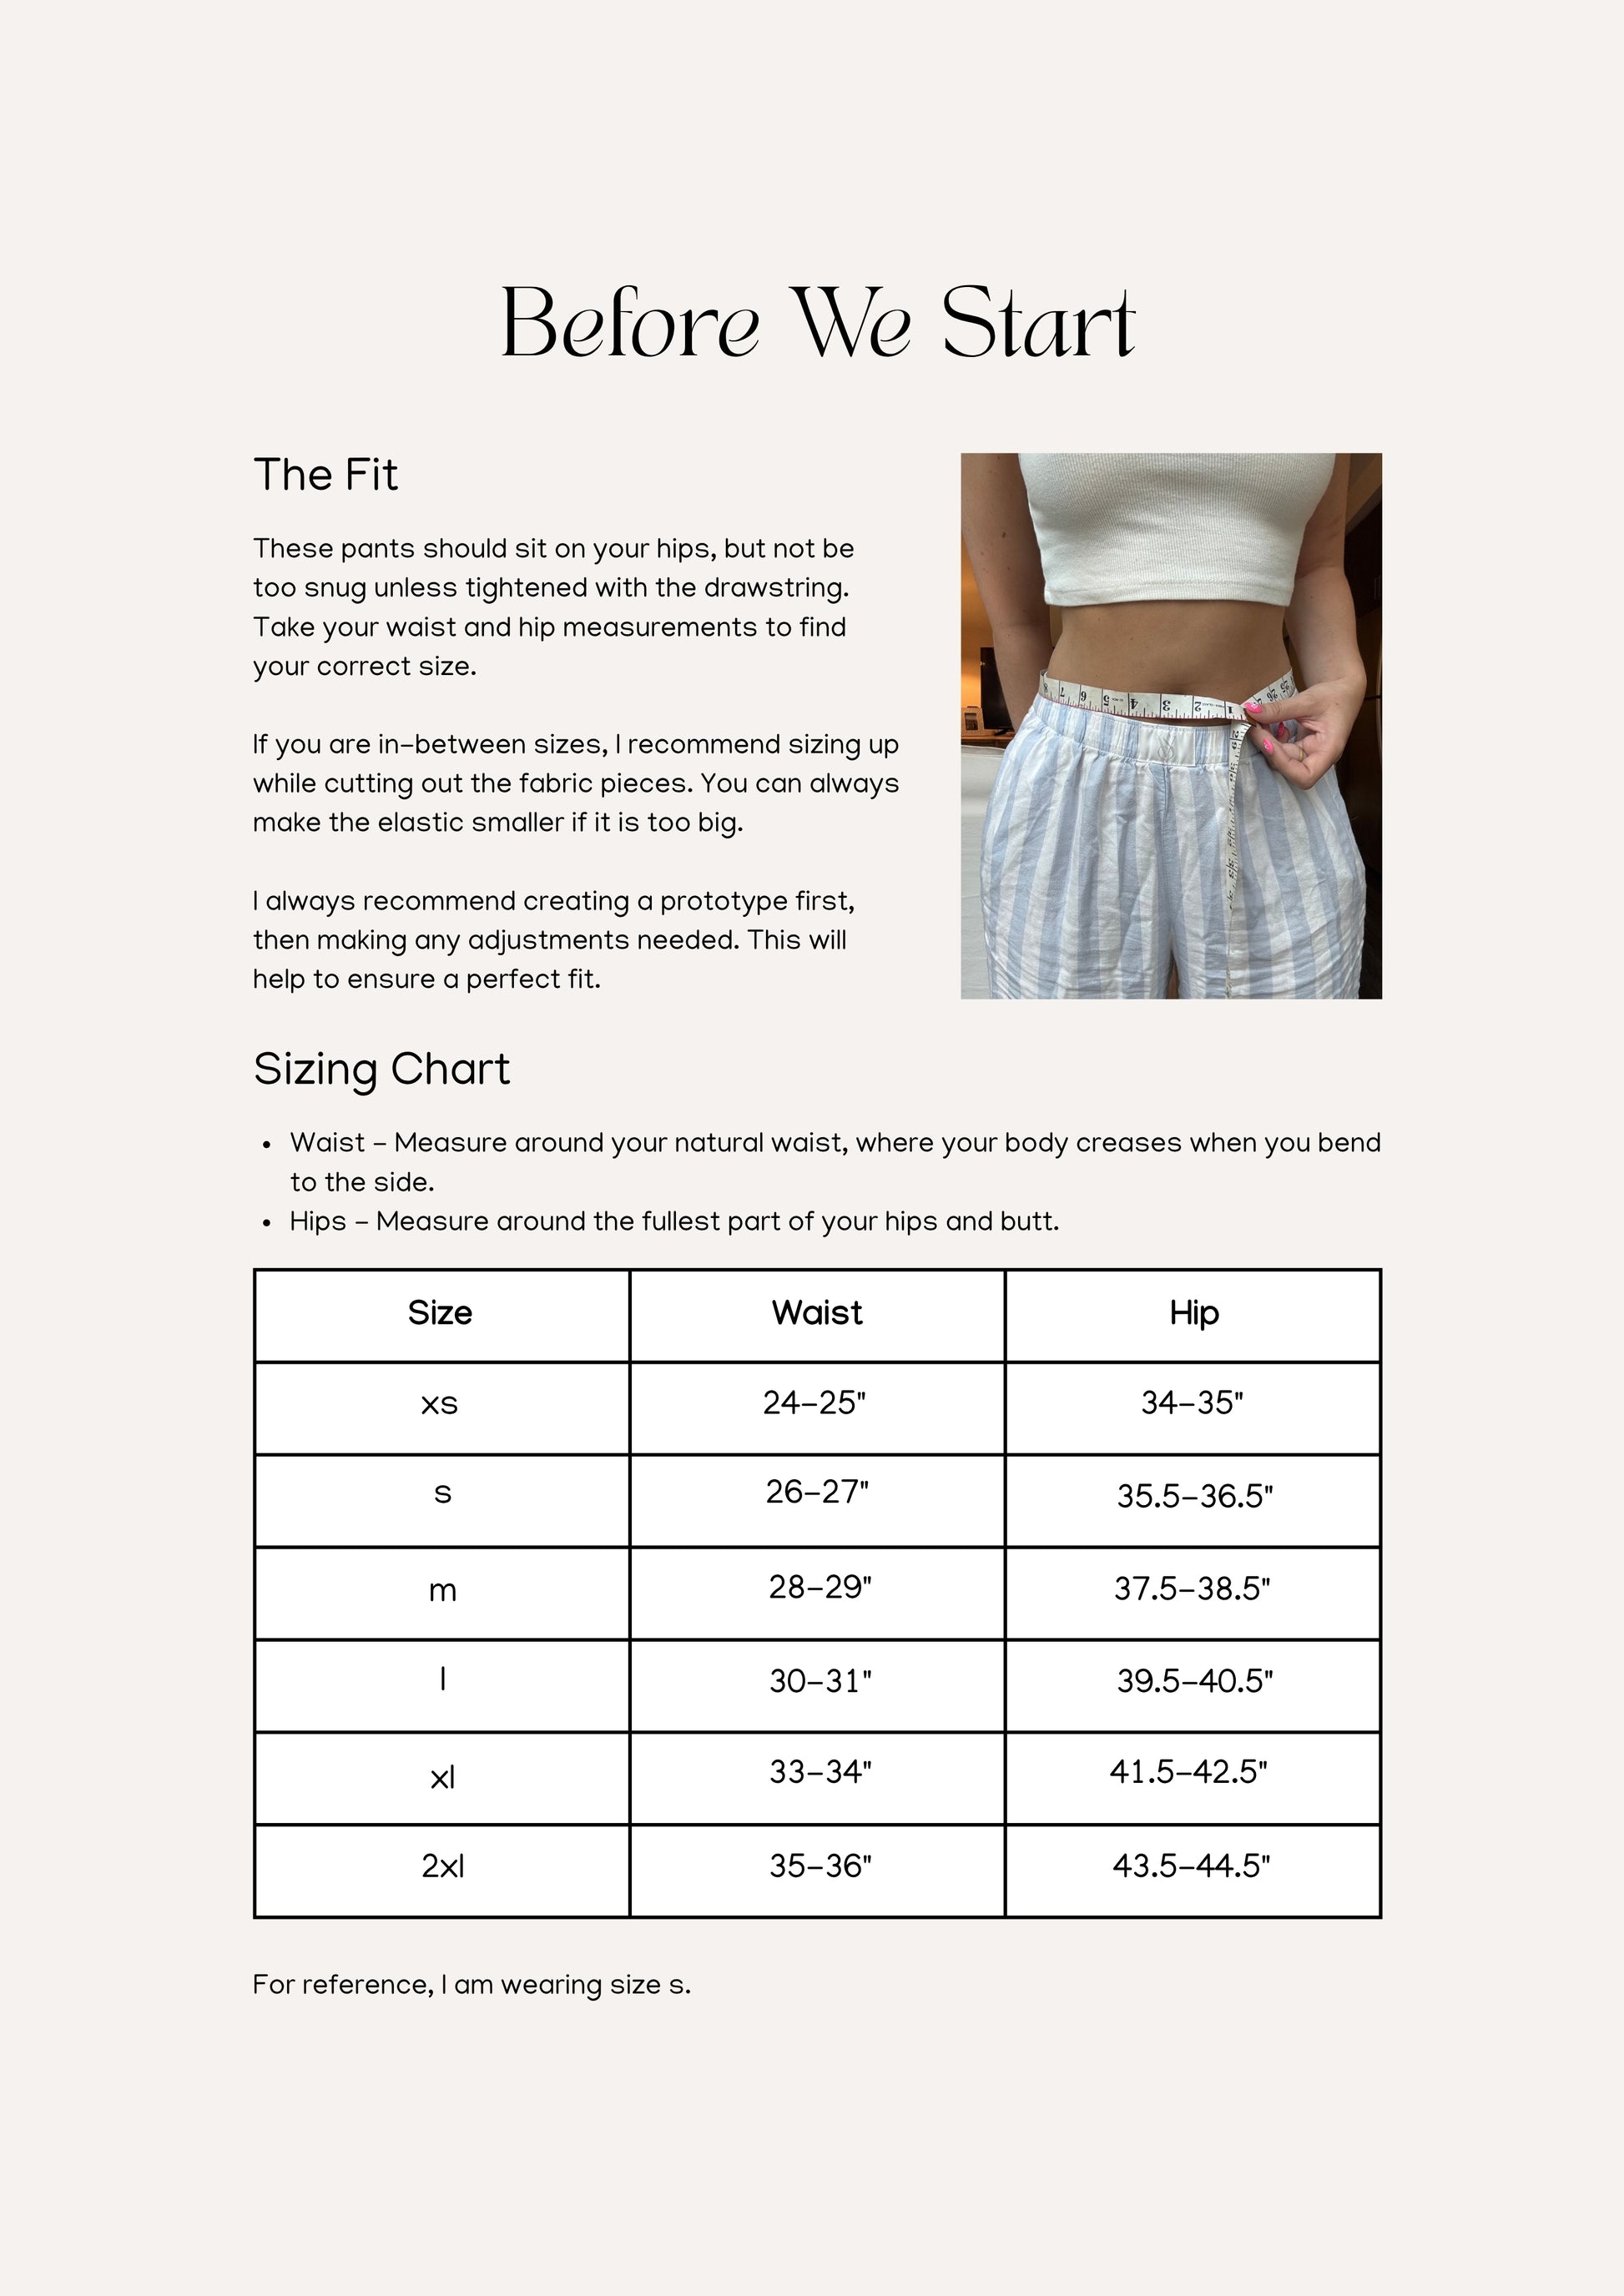
How to sew a hole (quick overview)
|
Step 1: Prepare the area around the hole |
Turn your garment inside out and trim any loose threads around the hole for clean edges. |
|
Step 2: Thread your needle and secure the thread |
Thread your needle, tie a knot at the end, and pick a thread color that matches your fabric (a darker thread is used in the photos for visibility). |
|
Step 3: Bring the edges of the hole together |
Pinch or clip the edges of the hole so they meet in the middle before you start stitching. |
|
Step 4: Sew small stitches across the hole |
Push your needle back and forth across the hole with small, even stitches until it's fully closed. |
|
Step 5: Secure the stitching |
Make a few extra stitches to lock everything in place, then knot and trim your thread. |
|
Step 6: Press the repair (optional) |
Press the repaired area with a low-heat iron to flatten the stitches and make the fix less noticeable. |
Learning how to sew a hole closed is easier than you think, and you don't need much to get started. A needle, some thread, and a few minutes is all it takes.
Fun fact: Damage and wear and tear is one of the top reasons consumers discard clothing, making a simple repair one of the easiest ways to reduce waste (The Roundup).
Tools needed to sew a hole
You only need a few basic supplies to sew a hole:
-
A needle (any hand-sewing needle will work).
-
Thread that matches your fabric color.
-
Scissors for cutting thread.
-
Pins to hold fabric in place (optional).
-
An iron for pressing the repair when finished (optional).
Related article: The Best Fabric Scissors for Every Sewing Project
Choosing the right needle and thread
A sharp hand-sewing needle and thread that matches your fabric color are all you need for most repairs.
For lightweight fabrics like cotton or linen, use a finer thread; for heavier fabrics like denim or canvas, go with a thicker one.
How to sew a hole for beginners
Sewing a hole by hand is one of the easiest repairs you can do at home. All you need is a needle, matching thread, and scissors (no sewing machine required)!
How to prep the area
Before you start sewing, turn your garment inside out and trim any loose or frayed threads around the hole. This gives you clean edges to work with and makes your repair much neater.

How to knot your thread correctly
To knot your thread, wrap the end around your finger once, then roll it off to form a small loop and pull it tight.
The knot should sit at the very end of the thread so it doesn't pull through the fabric when you start sewing.
Related article: How to Sew: A Complete Beginner’s Guide
Expert tip: I personally knot my thread at least 4 times in the same spot to make the knot bigger and bulkier, that way there's zero chance of it slipping through the fabric.
Just make sure the knot sits on the backside of your fabric so it stays hidden.
Method #1: how to sew a small rip or tear
The Ladder Stitch (or Invisible Stitch)
The ladder stitch is a hand-sewing technique that closes a seam or rip from the outside, leaving almost no visible stitching when done correctly.
Step 1: Thread your needle. Thread your needle and knot the end of your thread.
Step 2: Start on one side. Push your needle up through the folded edge on one side of the rip.
Step 3: Cross to the other side. Cross over and take a small stitch along the folded edge of the opposite side.
Step 4: Continue stitching. Go back to the first side and take another small stitch, then repeat.
Step 5: Pull the edges together. Every few stitches, gently pull the thread to draw the edges closed.
Step 6: Finish and secure. Once the rip is closed, knot and trim your thread.
Method #2: how to sew a small hole
Step 1: Prepare the area around the hole. Turn your garment inside out and trim any loose threads around the hole for clean edges.

Step 2: Thread your needle and secure the thread. Thread your needle, tie a knot at the end, and pick a thread color that matches your fabric (a darker thread is used in the photos for visibility).

Step 3: Bring the edges of the hole together. Pinch or clip the edges of the hole so they meet in the middle before you start stitching.

Step 4: Sew small stitches across the hole. Push your needle back and forth across the hole with small, even stitches until it's fully closed.

Step 5: Secure the stitching. Make a few extra stitches to lock everything in place, then knot and trim your thread.

Step 6: Press the repair (optional). Press the repaired area with a low-heat iron to flatten the stitches and make the fix less noticeable.

And you're done!

Method #3: how to sew a large hole
Patching (Invisible vs. Invisible)
Patching is the best way to repair a large hole because it covers the damaged area with a new piece of fabric for a stronger, longer-lasting fix.
Step 1: Cut your patch. Cut a piece of fabric slightly larger than the hole from a matching or coordinating fabric.
Step 2: Position the patch. Turn your garment inside out and center the patch over the hole.
Step 3: Pin it in place. Pin or baste the patch down so it doesn't shift while you sew.
Step 4: Stitch around the edges. Sew around the edges of the patch using small, even stitches.
Step 5: Choose your finish. For an invisible repair, fold and tuck the raw edges of the patch under before stitching. For a visible patch, sew it on top of the fabric from the outside.
Step 6: Finish and press. Knot and trim your thread, then press the area with an iron to flatten the repair.
For a more detailed guide with photos, read: How to Sew on a Patch (Sew-On and Iron-On Methods).

The Darning method
Darning works well for small to medium holes, thin spots, and areas where the fabric has worn down over time.
It's a great option when the hole is too big to simply stitch closed but too small to need a full patch.
What is darning?
Darning is a hand-sewing technique where you layer rows of stitches over a hole to create a woven patch made entirely from thread.
It's one of the oldest and most durable ways to repair fabric, and it doesn't require any extra material.
Fun fact: Darning dates back to at least the early 1600s, and the word may come from the Old English word dern, meaning "to hide" (Resurgence Magazine).
Example: darning socks
Darning is most commonly used to repair socks, especially at the heel or toe where fabric wears thin.
You weave thread horizontally and then vertically across the hole until the gap is completely filled in.
What is a darning needle?
A darning needle is a long, thick hand-sewing needle with a large eye, making it easy to thread with yarn or heavier thread.
It's the best tool to use for darning repairs because it glides through fabric smoothly without causing damage.
Tips for mending clothes
Here are a few simple tips to help your repairs look better and last longer:
-
Use thread that matches your fabric as closely as possible for a cleaner finish.
-
Always work from the wrong side of the fabric when you can.
-
Keep your stitches small and even for a stronger, neater repair.
-
Don't pull your thread too tight or the fabric will pucker.
-
Press your repair with an iron when you're done to flatten the stitches.
-
Test your repair on a scrap piece of fabric first if you're new to hand sewing.
Aftercare note
Once you've repaired a hole, wash the garment on a gentle cycle and avoid high heat in the dryer to help the repair last longer.
Give the stitching a quick check after the first wash to make sure everything held.
Fabric-specific troubleshooting
|
Fabric |
Common issue |
What to do |
|
Denim |
Edges fray heavily |
Trim threads and use a patch for extra support |
|
Knit/jersey |
Fabric stretches while sewing |
Use a stretch stitch and avoid pulling the thread tight |
|
Wool |
Hole edges felt or mat together |
Use a darning technique to rebuild the fabric |
|
Silk/satin |
Stitches show easily |
Use fine thread and the smallest needle possible |
|
Linen |
Fabric frays around the hole |
Trim edges and use small, tight stitches |
|
Fleece |
Fabric shifts while sewing |
Pin or clip edges in place before stitching |
Expert tip: For fabrics that fray a lot, like linen or denim, I sometimes use a lighter to lightly “sear” the raw edges around the hole, this melts the fibers into a sealed barrier and stops the fraying.
However, know that it will harden the edges slightly, so only use this method when the area doesn't need to stay soft and when you’re covering it up with a patch anyway.
Common mistakes when sewing a hole in your clothes
The most common mistake is using stitches that are too big or spaced too far apart, which makes the repair weak and noticeable.
Here are other mistakes to avoid:
-
Using thread that doesn't match the fabric color.
-
Pulling the thread too tight, which causes the fabric to pucker.
-
Skipping the knot at the end of the thread, so the stitching comes undone.
-
Not trimming loose threads before starting, which makes the repair messier.
-
Sewing through only one layer of fabric on thicker materials, which weakens the fix.

Troubleshooting common issues
How do I sew a hole without it puckering?
Puckering happens when the thread is pulled too tight while sewing. Keep your tension loose and even, and make sure you're not gathering the fabric as you stitch.
Why can I still see my stitches after repairing a hole?
Visible stitches are usually caused by using the wrong thread color or stitches that are too large. Try using a finer thread that closely matches your fabric, and keep your stitches as small as possible.
Why did my repaired hole open up again after washing or wearing the garment?
This usually means the stitches were too loose or the thread wasn't secured properly at the end.
Make sure to knot your thread tightly when you finish, and add a few extra stitches to lock the repair in place before trimming.
How do I stop my thread from tangling while hand sewing?
Use a shorter length of thread (around 18 inches is ideal) and let your needle hang freely every few stitches to untwist the thread.
Running your thread through beeswax or a thread conditioner can also help keep it smooth.
Why does my repair look bulky or lumpy?
Bulkiness usually comes from using thread that's too thick for the fabric, or from layering too many stitches in one spot.
Use a finer thread and spread your stitches evenly across the repair area.
Can you fix a hole in your clothes without sewing?
Yes! Iron-on patches and fabric glue are both no-sew options that can work well for small holes. They're quick and easy, but they tend to be less durable than a hand-sewn repair over time.
FAQ
What is the best stitch to repair a hole?
The ladder stitch is the best option for most holes because it pulls the edges together neatly and leaves very little visible stitching.
How to fix a hole in clothing without it showing?
The ladder stitch and darning method both produce low-visibility repairs when done with matching thread and small, even stitches.
How to fix holes in clothes without thread?
Iron-on patches and fabric glue are the easiest no-thread options for fixing a hole in clothing.
What are the four types of darning?
The four main types of darning are simple darning, Swiss darning, needle weaving, and reinforcement darning.
What is the difference between darning and patching?
Darning rebuilds the damaged area using thread alone, while patching covers the hole with a separate piece of fabric.
What is the best stitch for darning?
A simple running stitch worked in rows (first horizontally, then vertically) is the most common and effective stitch for darning.
What should I do if the fabric around the hole is weak or worn out?
Reinforce the area by sewing a patch behind the hole before stitching it closed, so the repair has strong fabric to anchor into.
Why doesn't my patch stay attached to the fabric?
This usually means the stitches around the edge of the patch are too loose or too far apart. Sew closer to the edge with smaller, tighter stitches to keep it secure.